
Physical therapist John Pallof shared a simple exercise with a few influential strength coaches in the early 2000s. It offered an effective way to challenge core stability in an upright, athletic position. Due to the exercise’s relative starting and ending point, he called it the belly press.
Fast-forward two decades. Pallof’s “belly press” was renamed by way of common usage, and what’s become known as the Pallof press is a mainstay exercise in settings from rehabilitation clinics to the strength and conditioning facilities of elite athletes. (1)(2)(3)(4)
This relatively new spin on the classic plank challenges core strength at a new angle, literally. The direction of force requires anti-rotation, as opposed to dynamic rotation. “Anti” movements are a generally overlooked and undertrained aspect of core health and strength.

How can a single exercise be effective across such a wide range of populations? Well, it’s scalable for difficulty, making it effective and accessible to beginners and experienced athletes alike. It also trains the body to resist rotation, which is useful across human movement patterns from athletics to daily life. Here’s a detailed look at the Pallof press and how to incorporate into your training plan.
Pallof Press
- How to Do the Pallof Press
- Pallof Press Mistakes to Avoid
- How to Progress the Pallof Press
- Benefits of the Pallof Press
- Muscles Worked by the Pallof Press
- How to Program the Pallof Press
- Pallof Press Variations
- Frequently Asked Questions
Classic Pallof Press Video Tutorial
Author Dr. Merrick Lincoln demonstrates the Pallof press in the video below. Read on for step-by-step instructions.
Pallof Press Tutorial
How to Do the Pallof Press
Follow these detailed instructions to dial-in proper Pallof press form for maximum benefit and efficiency. You’ll need a cable system with an adjustable pulley or a resistance band and a stable, chest-high anchor point.
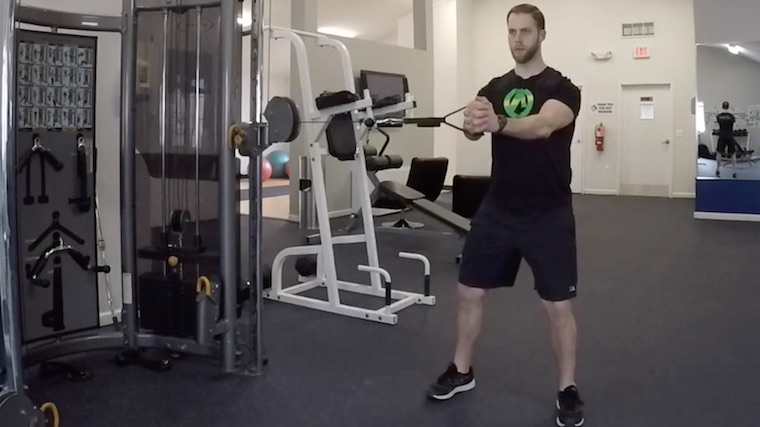
Step 1 — Set Your Equipment and Step Out
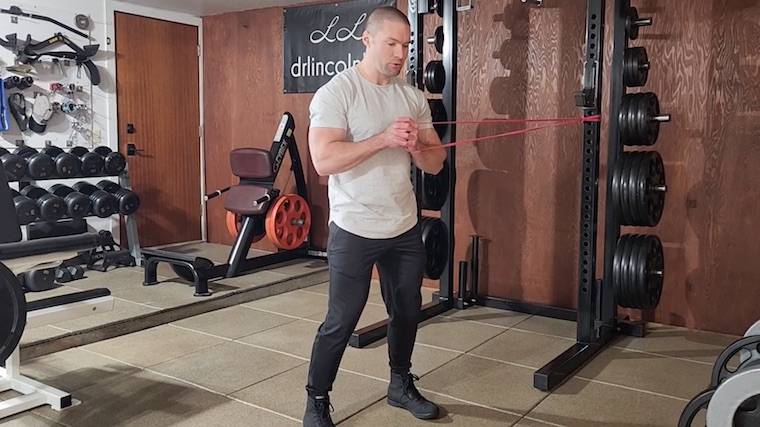
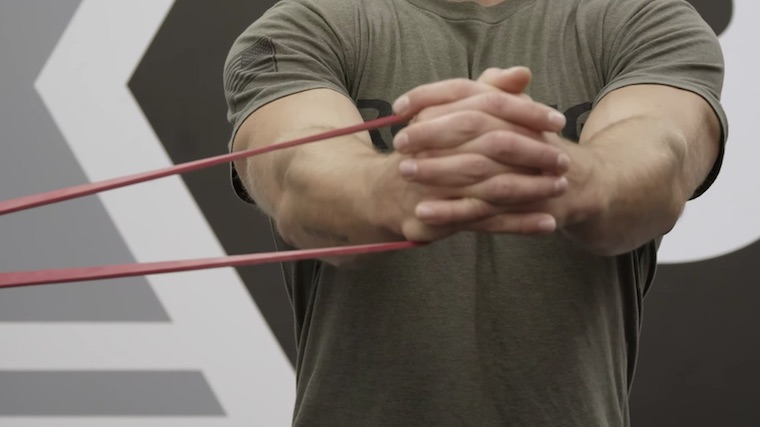
Set a resistance band or cable pulley (with a single handle attached) at approximately chest-height. Grasp the band or handle with both hands and hold it in front of your sternum with bent arms.
Pull your shoulders back and brace your core. Sidestep away from the anchor-point until you feel moderate tension on the band, or until the weight plates lift several inches from the cable stack.
Form Tip: Although this is just the “setup” of the exercise, your core is already experiencing resistance from the band or cable. Before the walkout, not after, is the best time to set your brace and tense your abs, as this avoids having to establish proper alignment while under greater resistance.
Step 2 — Quarter-Squat and Press
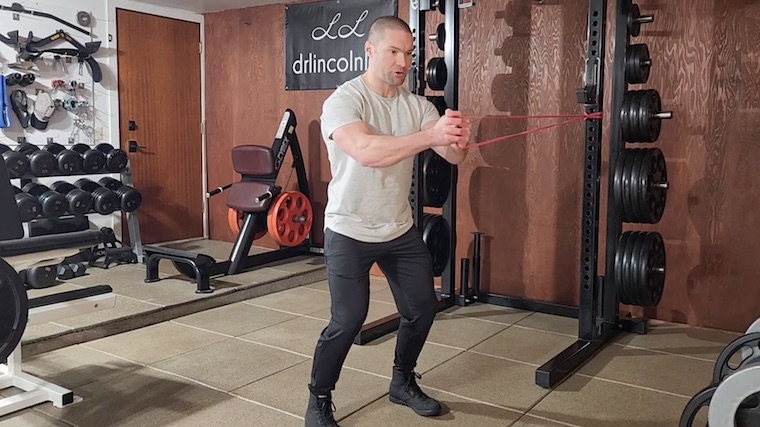
With your shoulders squarely over your pelvis and your feet just beyond shoulder-width, perform a shallow squat. Maintain this stable position throughout the remainder of the exercise. Slowly press the band or cable directly away from your sternum until your elbows are straight.
Form Tip: The turning force from the band or cable doesn’t stop at your core. You will need to establish a firm connection with the floor during the Pallof press. Accomplish this by attempting to “grip” or “spread” the floor with your feet.
Step 3 — Pause at Peak Tension
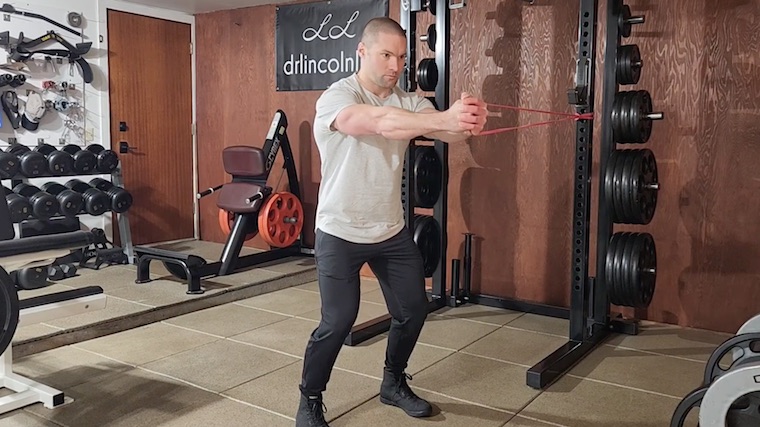
This portion of the exercise is responsible for a relatively large amount of the training stimulus, so give it plenty of attention. The end position of the press is the most challenging part of the exercise — Savor it by pausing for a moment or longer.
Form Tip: You’ve (likely) inhaled to set your brace before initiating the repetition, and you’ve exhaled throughout the pressing motion. Now, fill the pause at peak tension with another full breath cycle (breathe in, breathe out) without losing your brace. This is a good way to make sure you hold the pause for a sufficient duration.
Step 4 — Return to Start Position
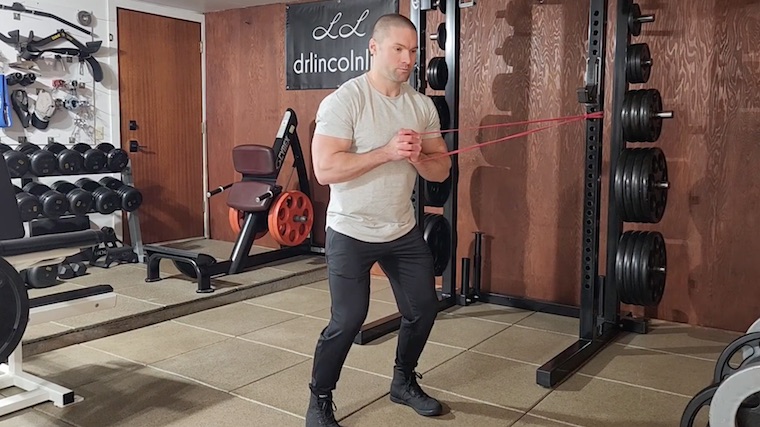
Pull the band or cable handle back to your sternum with a smooth, controlled movement. Repeat steps two through four (press, pause, pull back) for the desired number of repetitions before sidestepping toward the anchor point or pulley and switching sides.
Form Tip: Although the exercise becomes progressively easier as you bring the band or handle back toward the start position, do not lose your brace. Strive for no movement below the shoulders.
Pallof Press Mistakes to Avoid
Don’t be lulled into thinking this simple-looking exercise doesn’t require focus. Avoiding these Pallof press pitfalls ensures exercise effectiveness.
Setting Up at an Angle
One common error in the Pallof press occurs before the exercise really begins. After you step out with band or cable, your torso must be perpendicular to the line of pull of the resistance. Don’t bend at your waist and don’t stand in front of, or behind, the anchor point or cable.
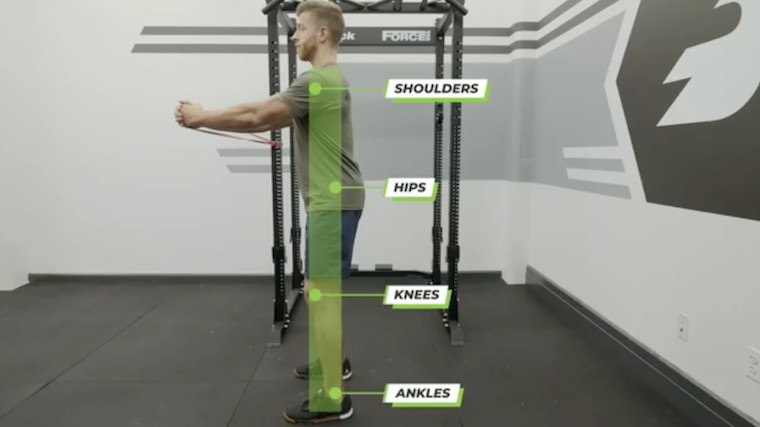
Any substantial deviation from perpendicular will reduce the effectiveness of the exercise by decreasing the turning force (“torque”) applied to your trunk. An oblique angle reduces demand on your obliques.
Avoid it: No need to track down a protractor or angle finder. Just imagine a straight line running between your shoulder joints and another straight line running through your hip joints. These two imaginary lines should be parallel to each other and run at a right angle to the actual line of the band or cable.
Midsection Motion
Poor trunk control during the Pallof press is indicative of a misunderstanding of the exercise or the use of too much resistance. Assuming you’re not simply overpowered by the band or cable, you can improve your Pallof press form by focusing on a “braced” midsection.
Avoid it: Treat the Pallof press like a “standing plank.” Make your trunk rigid by bracing or co-contracting the muscles on the front, back, and sides of your midsection.
Retreating Quickly From Peak Tension
The Pallof press should be most challenging after the press, when your arms are outstretched in front of the body. This is informed by Newtonian physics (i.e. “law of the lever”) and it’s supported by the obvious sensation of effort you should feel at the end-range.
Avoid it: Make Sir Isaac Newton proud by pausing and demonstrating control when the resistance force has the most leverage. When your elbows are straight and your hands are at approximately chest-height, take a moment to verify your shoulders and hips are square. As you breathe during the pause, make sure your midsection is tight and braced before returning to the start position.
How to Progress the Pallof Press
When progressing the Pallof press, use a combination of traditional exercise variables (e.g. adding resistance or volume) and non-traditional variables (e.g. devising modifications that increase the technique-demands or complexity of the exercise. (5) When the traditional Pallof press gets too easy, lean into one or more of the progression strategies below.
Change the Base of Support
The basic version of the Pallof press is performed with both feet slightly outside shoulder-width. Your “base of support” is always going to be the area outlined by your feet and all the space between the feet. The exercise becomes drastically more difficult with a smaller base of support. Achieve this progression by standing with a narrower stance. Once you’re able to perform Pallof presses with your feet together, try the lunge variation or even the single-leg variation, described below.
Increase the Number of Repetitions
For performance training, the Pallof press is considered an “accessory exercise,” generally performed for moderate to higher repetitions. It isn’t the type of exercise conducive to high resistance/low repetition programming. No one cares about your Pallof press one-repetition maximum. Rather than push for more resistance, push for higher-repetition sets. Work up to sets of 20 or more smooth, controlled repetitions before worrying about adding resistance.
Increase the Movement Speed
Your primary task during the Pallof press is to keep your trunk motionless. Or, if there is any motion or loss of the initial trunk position, your task is to regain control and re-achieve the initial position as soon as possible. In fact, the latter scenario most closely describes the biomechanics definition of stability. (6) Rapid movement speed during the Pallof press exposes the body to a greater stability challenge.
How To: The Pallof Press
As long as any movement below your shoulders is minimal and well-controlled, increasing the speed of the pressing motion can be an effective progression. However, even when performing faster repetitions, you should still pause at peak tension when arms are fully outstretched.
Benefits of the Pallof Press
Isometric core exercises like the Pallof press are recommended to improve core muscle endurance. (7) But the benefits of the Pallof press don’t stop there. Emerging research points to its potential role in improved sports performance and injury-risk reduction.
Enhances Force Transfer and Performance
From a movement development perspective, we know the ability to control the trunk and demonstrate stability is a prerequisite for effective limb movement. This is evidenced by babies sitting unsupported before they walk or before launching their toys across the room. This same phenomenon is seen in athletes, albeit during much higher-level activities. Trunk stability enhances the ability to generate forceful, rapid, and precise limb movement. (8) The good news is, this appears to be trainable.
For example, a core training program including Pallof press variations was shown to improve striking force among Muay Thai athletes. (9) Whether you’re a fighter, thrower, field- or court sport player, swimmer, or just about any other type of athlete, progressive training with the Pallof press might up your game.
Teaches You To ‘Breathe and Brace’
Many sports and athletic endeavors require the skill of simultaneous breathing and bracing — sprinting, kayaking, swimming, and pretty much any CrossFit-style workout, just to name a few. The peak tension position of the Pallof press is a great opportunity to practice this skill.
As noted in the step-by-step instructions, you should pause when your arms are fully pressed away from your sternum. If you fill this pause with one or more breath cycles while also preventing any motion between your shoulders and hips, you are training “breathing and bracing.” Since the Pallof press is typically programmed as a fairly-high repetition, moderate-to-low load exercise, it gives plenty of opportunities to practice.
Potentially Reduces Injury Risk
Poor core stability is thought to predispose athletes to injury. (10) And although we know not all injuries can be prevented, there is a strong case for the inclusion of core exercises like the Pallof press in workout programs designed to reduce injury risk. Improving core stability is thought to improve control or coordination of the body and limbs. (10)(11) And improved coordination may translate into reduced risk for injury.
For example, across 13 studies, core training was shown to improve balance, which may ultimately decrease the risk of injurious falls. (12) Altogether, exercises intended to improve stability and coordination (i.e. “neuromuscular training”), along with strength training, are among the most well-supported types of training to reduce risk of injury. (13)
Muscles Worked by Pallof Press
Although the term “press” may seem to imply the shoulders are targeted, the Pallof press is decidedly core work. The pressing motion is minimally-resisted due to the body’s orientation to the line of pull of the band or cable stack. The press isn’t “lifting” the weight. Instead, the exercise hammers your core, particularly the muscles that prevent trunk rotation.
Abdominals
The primary muscle task during the Pallof press is to resist trunk rotation, which is why the movement pattern is termed “anti-rotation.” Muscles that act to rotate the trunk contract isometrically and create tension without creating appreciable movement.

Key muscles include the external obliques and internal obliques. Your rectus abdominis (i.e. the six-pack abs) and transversus abdominis (the deepest abdominal muscle) may also contribute to the Pallof press by increasing intra-abdominal pressure to increase the rigidity of your trunk.
Tiny Back Muscles
Often forgotten, many small muscles on the backside of the trunk contribute to trunk rotation and anti-rotation. These muscles are arranged between the bones of the spine (vertebrae), run between the ribcage and vertebrae, or span the pelvis and sacrum to vertebrae.
Among them, erector spinae may be the most notable, but semispinalis, multifidi, and rotatores deserve honorable mention. Multifidi and rotatores, in particular, are thought to produce“fine-tuning” muscle contractions needed for effective stabilization of the spine. (14)
How to Program the Pallof Press
For most, the Pallof press is an accessory exercise, meaning it plays a supplementary role in the training program. Accessory exercises can be programmed in a variety of ways, provided they support, or at least do not interfere with, the primary objectives of the workout.
As a Warm-up or Primer
The warm-up is a time dedicated to increasing body temperature and rehearsing movements that support the upcoming training session. It’s also a great time to incorporate core work. As a fairly low-intensity exercise, the Pallof press is well-suited for inclusion during any general warm-up.
As Dedicated Core Training
By setting aside time specifically for core training, as you likely do for your shoulders, arms, chest, back, or quadriceps, you help to ensure the work gets done. The Pallof press primarily works the rotators of the trunk. Therefore, to create a robust core workout, you may also wish to add exercises targeting the flexors, extensors, and lateral flexors of the core, such as crunches or planks, Roman chair back extensions, and farmer’s walks, respectively.
Palloff Press and Lift
Although the Pallof press is a wonderfully effective year-around core exercise for most individuals, high-level athletes may wish to incorporate more dynamic trunk rotation training, such as medicine ball twists and tosses, during the pre-season and in-season for more sport-specific training. (7)
As Rest Interval “Filler”
The amount of exercise completed in a defined period of time determines the density of a workout. Increasing the density of your workouts makes them more efficient, as long as the additional work (or reduced rest) does not adversely affect exercise performance. The Pallof press does not create excessive fatigue in muscles commonly targeted by traditional resistance training.
Therefore, it may be a great “filler” exercise. Take some of the two or three minutes you’d typically rest passively between sets of bench presses, rows, or any other exercise, and hit a set of Pallof presses. By supersetting the Pallof press with another exercise, you’ll increase the efficiency of your workout and keep your mind (and body) engaged throughout your entire training session.
Pallof Press Variations
The Pallof press can be modifiable in countless ways. Below, find a beginner-friendly version of the Pallof press, followed by three relatively more advanced modifications.
Half-Kneeling Pallof Press
To reduce the difficulty of the Pallof press, try the “half-kneeling” position. Place your inside knee (the leg closest to the band or cable stack) on the floor and bend your outside leg 90-degrees at the knee and hip. Place your front foot flat on the floor. (1)
Half Kneeling Pallof Press
From this position, brace your midsection and perform the Pallof press with typical pressing technique. When you switch sides, be sure to switch leg positions — the leg closest to the resistance is on the ground and your opposite foot is flat on the floor.
Lunge-Position Pallof Press
Performing the Pallof press in a lunge stance increases the difficulty by narrowing your base of support. (1) With your outside leg in front, drop into a narrow lunge position, brace, then perform the Pallof press with standard “press and pause” form.
Lunge Position Pallof Press
Be sure to keep your outside knee pointing straight ahead, as tension from the band or cable will try to “unravel” your body. Don’t allow your knee to collapse inward. When you switch sides, switch lead legs and repeat the lunge position.
Single-Leg Pallof Press
The single-leg Pallof press is performed standing on the outside leg — The leg farthest from the anchor point of the band or the cable stack. By performing the exercise on one leg, the single-leg Pallof press increases training demand on the lateral hip muscles, namely the gluteus medius. (4)
Single Leg Pallof Press
You will also need to prevent your foot and ankle from caving inward (“pronating”) under the pull of the band. To get the greatest training effect from the foot and ankle complex, perform in minimalist shoes or even barefoot.
Chaos Pallof Press
To further progress the Pallof press, increase the reactive demand of the exercise by adding a light weight to the center of the resistance band setup (demonstrated in the video). Be sure the weight is secured in place, so it can’t slide up and down the length of the band.
“Chaos” Pallof Press
Performing the “press” portion rapidly will create oscillating movements of the weight plate. Your core muscles will be forced to contend with the added, and somewhat unpredictable, challenge of the bouncing plate. Hold the paused position to regain core control before continuing repetitions.
FAQs
Why are there so many Pallof press variations?
Core stability can be conceptualized as a function of capacity (i.e. strength, power, endurance) and control (i.e. coordination). Increasing resistance or adding extra sets and repetitions to core stability exercises primarily improves the core’s capacity. To improve control, modifications that increase the technical difficulty of the exercise are indicated. That is, we need to progress the complexity of the exercise. (5)
We can increase the complexity of the Pallof press in many ways. These include, but are not limited to, decreasing the footprint or “base of support” (as in the lunge-position and single-leg variations), increasing the movement speed, adding instability by standing on a balance pad, or incorporating a reactive challenge (as in the chaos Pallof press). As long as you adhere to the basic movement principles and technique guidelines, you are only limited by your creativity when developing variations of the Pallof press.
Should I use a cable stack or a resistance band for the Pallof press?
Equipment availability and personal preference should be the key determinants of whether to use a cable stack or a resistance band. Assuming both are available, consider the pros and cons of each.
Compared to bands, the cable stack allows for more consistent external resistance and provides the ability to adjust loading in smaller, more quantifiable increments. But low-quality or poorly maintained cable stacks can feel rough and friction in the machine can negatively affect the resistance during the exercise.
Elastic bands are inexpensive and convenient. They are better than cables for training at high speeds due to minimal inertial forces. Like cable stacks, elastic bands allow for modification of the resistance, but you will need to either change out resistance bands to accommodate you desired resistance level or set up closer or farther from the anchor point to adjust the band’s stretch.
Due to the elastic nature of the resistance band, it will apply more resistance when your arms are fully outstretched than when your arms are pulled in. That is, expect a more dramatic resistance curve with resistance bands — At the hardest part of the movement, the demand is on your trunk is even greater. This feature may introduce a bottleneck effect: It could limit the resistance used ,as well as your ability to progress to thicker resistance bands.
How often should I perform the Pallof press?
When programmed for injury prevention or athletic performance enhancement, core training is commonly performed at moderate to high frequencies with at least two sessions per week and as many as seven days per week. (9)(12)
To accomplish this, complete a couple of sets during the warm-up for your daily workout, or designate two or three core-focused sessions per week to complete three to six sets of the Pallof Press per session.
Make Room for Anti-Rotation in Your Exercise Rotation
Since its introduction, the Pallof press has become a contemporary classic exercise. It builds rotational strength and enhances trunk stability. And it might even boost athletic performance and reduce injury risk. Remember, to achieve meaningful benefits, consistency and progression are key.
References
- Mullane, M., Turner, A. N., & Bishop, C. (2021). The Pallof Press. Strength & Conditioning Journal, 43(2), 121-128.
- Wilson, K. W., et al. (2019). Rehabilitation and return to sport after hip arthroscopy. Operative Techniques in Orthopaedics, 29(4), 100739.
- Cotter, A. (2022). Return to Sport Following Anterior Cruciate Ligament Reconstruction: Women’s Field Hockey. Journal of Women’s Sports Medicine, 2(2), 57-69.
- Holling, M. J., Miller, S. T., & Geeslin, A. G. (2022). Rehabilitation and Return to Sport After Arthroscopic Treatment of Femoroacetabular Impingement: A Review of the Recent Literature and Discussion of Advanced Rehabilitation Techniques for Athletes. Arthroscopy, Sports Medicine, and Rehabilitation, 4(1), e125-e132.
- La Scala Teixeira, C. V., et al. (2019). Complexity: a novel load progression strategy in strength training. Frontiers in Physiology, 10, 839.
- Reeves, N. P., Narendra, K. S., & Cholewicki, J. (2007). Spine stability: the six blind men and the elephant. Clinical Biomechanics, 22(3), 266-274.
- Willardson, J. M. (2007). Core stability training: applications to sports conditioning programs. The Journal of Strength & Conditioning Research, 21(3), 979-985.
- Kibler, W. B., Press, J., & Sciascia, A. (2006). The role of core stability in athletic function. Sports Medicine, 36, 189-198.
- Lee, B., & McGill, S. (2017). The effect of core training on distal limb performance during ballistic strike manoeuvres. Journal of Sports Sciences, 35(18), 1768-1780.
- Willson, J. D., et al. (2005). Core stability and its relationship to lower extremity function and injury. JAAOS-Journal of the American Academy of Orthopaedic Surgeons, 13(5), 316-325.
- Huxel Bliven, K. C., & Anderson, B. E. (2013). Core stability training for injury prevention. Sports Health, 5(6), 514-522.
- Barrio, E. D., et al. (2022). Effects of core training on dynamic balance stability: A systematic review and meta-analysis. Journal of Sports Sciences, 40(16), 1815-1823.
- Lauersen, J. B., Bertelsen, D. M., & Andersen, L. B. (2014). The effectiveness of exercise interventions to prevent sports injuries: a systematic review and meta-analysis of randomised controlled trials. British Journal of Sports Medicine, 48(11), 871-877.
- Kavcic, N., Grenier, S., & McGill, S. M. (2004). Determining the stabilizing role of individual torso muscles during rehabilitation exercises. Spine, 29(11), 1254-1265.
Featured Image: Merrick Lincoln, DPT, CSCS / YouTube